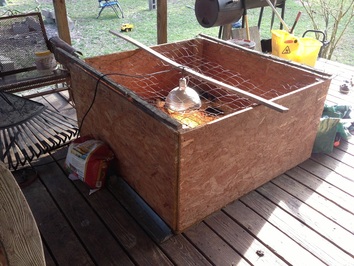
 Our 4' X 4' homemade brooder box is made from 2 sheets of 3/4" OSB, 2' lengths of scrap 2X4's, a scrap piece of 2X4 welded wire fence, some scrap pieces of 1X2 lumber (lotta "scraps," huh?), and a handful of deck screws. The bottom of the box is a full half of one of the sheets of OSB, and the sides are made from the remainder of the OSB, cut into 2' X4' pieces. The 2' 2X4's are placed in the corners, and the sides are screwed to the 2X4's. The sides are not secured to the bottom - the whole contraption just sits on the bottom piece, and is plenty heavy enough to stay in place. We wrapped the 2X4 welded wire fence around a 1X4 on opposite sides of the fence, allowing us to pull it across the top of the box to make the fence semi-tight. We drilled screws into the upper end of the 2X4 corner braces, and lock the fence in place over the screws. And we used one more scrap 1X4 as a brace for the heat lamp across the center of the box. Screwing the box together has allowed us to easily assemble, disassemble, and reassemble with ease for several years. When not in use, the pieces are slid behind a tool cabinet in our storage shed, hardly taking up space at all. Pretty handy. 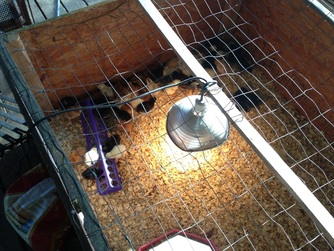 The bedding consists of one full bale of compressed pine shavings. Years ago, someone told us of the "sanitizing" nature of pine shavings, and our experience has borne that out. In fact, we don't expect to have to change this bedding until these chicks are ready to move out. Instead, we will occasionally stir the pine shavings thoroughly using a 4-pronged rake. Believe it or not, even with 50 or 60 chicks in there, the smell is only faint if one is diligent to stir the pine shavings at regular intervals (weekly at this point, every couple of days as the chicks get bigger). Again, this may be the last brooder box we ever need, as we have every expectation that we will be using it years from now (only replacing the fence on top, perhaps). Here is the link to an accompanying video, with more detailed images --> Click This. ~ Tommy Alderman  |
 Archives
June 2020
Categories
All
|

 RSS Feed